If you surf Twitter a lot, and search “deleted photos on iPhone” from time to time, you may find it seems normal that the photo losing problem is one of the biggest yet most common issues an iPhone user may face. For many Apple users, it’s popular to activate iCloud Photo Library and sync one’s own photos anywhere anytime, especially for those who are serious users having multiple iOS devices. ICloud Photo Library indeed is good enough for you to view your photos among various devices, however, it also has some disadvantages.
For any iOS user not new to iCloud, I guess you all know that iCloud will sync all your photo data as long as your device is in a good network connection, if you’ve activated Photo Library. In other word, all your edits to your photos will be synced immediately as well, and there is no “Un-do” button. For instance, you took a good picture, but you accidentally trimmed it wrong, then the wrong trimming will be synced to iCloud as well and replace the original one. The same happen to deleting action, if you permanently delete a photo on your iPhone/iPad, it is gone from iCloud, too.
Though Apple introduced “Recently Deleted” in both Photos app and Notes app, sometimes you may find that the photo you deleted doesn’t appear in that folder for you to recover. In this situation, the photo may be gone as well from iCloud, and hence we need another way to get it back. Outside iCloud, there’s not much way for you to back up photos on iOS device, unless you use other apps like Google Photos. Therefore in this post, I will talk with you about, how to restore only photos but not the whole iPhone/iPad from iTunes backup.
What You Need for Restoring Photos from iTunes Backup
To restore only photos from iTunes backup, aka to extract backed-up photos from encrypted iTunes backup file, is not a toughest work, but it needs certain kind of knowledge that ordinary people don’t know. So if you are not a serious programmer or genius in computer science, you will need other tools to help you accomplish this task.
Apple encrypts iTunes backup for privacy protection, and hence they won’t provide any program to extract backup files for people. As a result, you may rely on the third-party extractor tools. There are many of this kind on the Internet, and it’s easy to search one. Here in this article, I will take one of the best, Gihosoft iPhone Data Recovery as example, which I have used for almost 3 years and it still satisfy me.
Preparation:
A computer authorized by you has an iTunes backup, better with iTunes installed.
Steps to Restore Only Photos from iTunes Backup
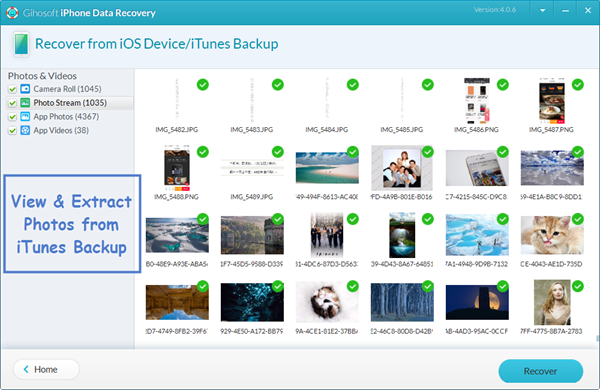
- Run Gihosoft iPhone Data Recovery on your computer, and select “Camera Roll”and “Photo Stream”. (If needed, select “App Photos” as well)
- Don’t connect your iPhone/iPad here. And choose “View iTunes Backup”.
- Select the matched iTunes backup of your iOS device, and then click Next.
- Wait for the process finished, and then view the scanned result.
- Find and select the photos deleted from iPhone, then click “Recover”to export them from iTunes backup.
Another Tool to Extract Photos from iTunes Backup
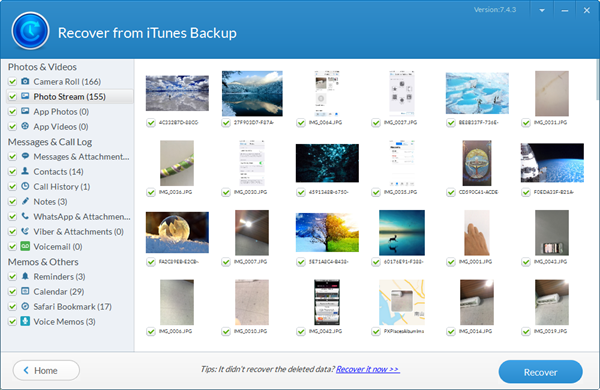
Besides Gihosoft iPhone Data Recovery, recently I found another useful tool to extract photos from iTunes backup. This tool is iTunes Backup Extractor, as its name telling, is a utility merely dedicated to extract data from iTunes backup. You can try this if you just want to export iTunes data but not with other actions like data recovery.
How to Extract Photos from iTunes Backup with Safe & Pure Tool
- Install the iTunes Extractor on PC, and run it later.
- Choose the matched iTunes backup of your iPhone and click Next.
- Select photo related item in the following data type page and click Next to start scanning.
- Then you can easily extract photos from iTunes backup just simply click “Recover”.
These two methods mentioned above can also be also applied to all generations of iOS devices like iPhone, iPad and iPod Touch, with the support of the latest iOS version (iOS 12 included).
Related readings: