How to Hide Photos on iPhone from Prying Eyes

People value their privacy. So they will never let any of their personal photos or videos be available to someone else. But in many cases, others may catch sight of your private photos by chance. For example, your family or friends borrow your iPhone or you open the Photos app in front of them. You can delete the photos to prevent these situations from ever happening. But I believe most users prefer hiding pictures on their iPhone.

Hide Photos in the Photos App

You can hide photos and videos in the Photos app on your iPhone or iPad directly. It may not be quite what you think hiding photos is. It is to create a “Hidden” album in the Photos app and move all the photos or videos that you want to hide there from your Moments, Years, and Collections view. But it still works for preventing peep, especially malicious voyeurs.

Here’s how to hide photos on your iPhone or iPad:

  • Open Photos app on your device.
  • Select the picture or video that you want to hide.
  • Tap on the Share icon. Then scroll down to the “Hide” option and tap it.
  • Tap “Hide Photos” to confirm that.hide-photos-in-photos-app

By doing so, the selected photo or video is only available in the Hidden album but disappeared from other places in your photo library. You can tap Album tab > Hidden and find your hidden pictures and videos there. To unhide a photo, you can repeat the first three steps except that the “Hide” option has been changed to “Unhide”.

Lock Photos in the Notes App

Some users may be a bit disappointed after reading the first option because they want a password to protect those sensitive photos rather than just gather them in another photo album. Well, then you may recur to the Notes app on your iPhone. Let’s see how to hide your pictures by locking them in the Notes app.

  1. Open Photos app on your iPhone.
  2. Select the picture that you’d like to hide.
  3. Tap the share icon and you’ll see an app list.
  4. Tap the Notes icon in the list, then tap “Save”.share-photo-to-notes-app
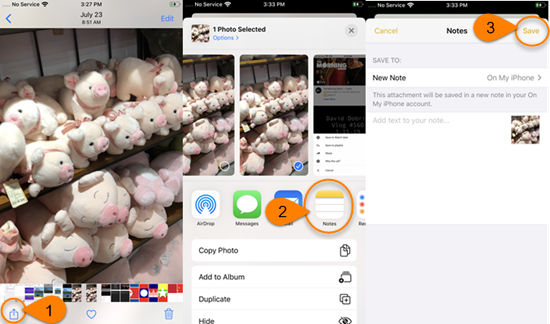
  5. Navigate to the Notes app and find that picture.
  6. Swipe it from right to left and tap the lock icon in the menu.
  7. Set a password for your locked note. Or you can use Touch ID or Face ID to lock and unlock the note.lock-photo-in-notes-app

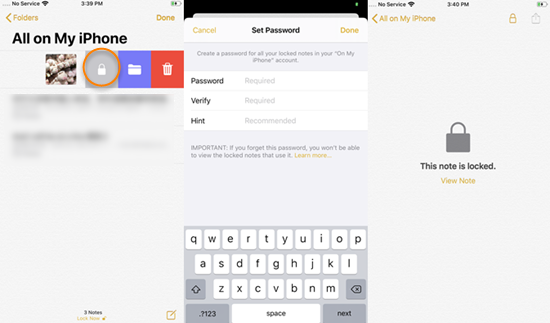
You’ll see the locked note when you reopen the Notes app. After that, don’t forget to delete your private photos that have been locked. One thing you should take note is that notes with video, audio, PDF, or file attachments can’t be locked. So you cannot hide videos on the iPhone with this method.

Hide Pictures and Videos by Third-party Apps

The chances are that you don’t like either of the above two options. In this case, you can use some third-party apps in the App Store to get the job done. I don’t recommend this method myself. But if you’ve made up your mind, do sharpen your eyes and pick out a reliable app to avoid privacy disclosure.

Tips: Sometimes you may lose some precious photos or videos on your iPhone due to accidental deletion, iOS upgrade failure, jailbreak, broken device, etc. You can use the Jihosoft iPhone Data Recovery to recover your lost photos and videos from the iPhone even without backup.


How to Download & Purchase Gihosoft iPhone Data Recovery

Last time I’ve talked about “How to Fully Use Gihosoft iPhone Data Recovery Free of  Charge” and shown you some free tricks with this software on iOS data transfer and recovery. Today, we are going to talk about how to purchase the software to get its full features of Pro version.

Continue reading →

restore-only-iphone-photo-from-itunes-backup

How to Restore Only Photos from iTunes/iCloud Backup

If you surf Twitter a lot, and search “deleted photos on iPhone” from time to time, you may find it seems normal that the photo losing problem is one of the biggest yet most common issues an iPhone user may face. For many Apple users, it’s popular to activate iCloud Photo Library and sync one’s own photos anywhere anytime, especially for those who are serious users having multiple iOS devices. ICloud Photo Library indeed is good enough for you to view your photos among various devices, however, it also has some disadvantages.

For any iOS user not new to iCloud, I guess you all know that iCloud will sync all your photo data as long as your device is in a good network connection, if you’ve activated Photo Library. In other word, all your edits to your photos will be synced immediately as well, and there is no “Un-do” button. For instance, you took a good picture, but you accidentally trimmed it wrong, then the wrong trimming will be synced to iCloud as well and replace the original one. The same happen to deleting action, if you permanently delete a photo on your iPhone/iPad, it is gone from iCloud, too.

Though Apple introduced “Recently Deleted” in both Photos app and Notes app, sometimes you may find that the photo you deleted doesn’t appear in that folder for you to recover. In this situation, the photo may be gone as well from iCloud, and hence we need another way to get it back. Outside iCloud, there’s not much way for you to back up photos on iOS device, unless you use other apps like Google Photos. Therefore in this post, I will talk with you about, how to restore only photos but not the whole iPhone/iPad from iTunes backup.

What You Need for Restoring Photos from iTunes Backup

To restore only photos from iTunes backup, aka to extract backed-up photos from encrypted iTunes backup file, is not a toughest work, but it needs certain kind of knowledge that ordinary people don’t know. So if you are not a serious programmer or genius in computer science, you will need other tools to help you accomplish this task.

Apple encrypts iTunes backup for privacy protection, and hence they won’t provide any program to extract backup files for people. As a result, you may rely on the third-party extractor tools. There are many of this kind on the Internet, and it’s easy to search one. Here in this article, I will take one of the best, Gihosoft iPhone Data Recovery as example, which I have used for almost 3 years and it still satisfy me.

Preparation:

A computer authorized by you has an iTunes backup, better with iTunes installed.

Steps to Restore Only Photos from iTunes Backup

  1. Run Gihosoft iPhone Data Recovery on your computer, and select “Camera Roll”and “Photo Stream”. (If needed, select “App Photos” as well)
  2. Don’t connect your iPhone/iPad here. And choose “View iTunes Backup”.
  3. Select the matched iTunes backup of your iOS device, and then click Next.
  4. Wait for the process finished, and then view the scanned result.
  5. Find and select the photos deleted from iPhone, then click “Recover”to export them from iTunes backup.

recover deleted photos from iPhone backup

Another Tool to Extract Photos from iTunes Backup

Besides Gihosoft iPhone Data Recovery, recently I found another useful tool to extract photos from iTunes backup. This tool is iTunes Backup Extractor, as its name telling, is a utility merely dedicated to extract data from iTunes backup. You can try this if you just want to export iTunes data but not with other actions like data recovery.

How to Extract Photos from iTunes Backup with Safe & Pure Tool

  1. Install the iTunes Extractor on PC, and run it later.
  2. Choose the matched iTunes backup of your iPhone and click Next.
  3. Select photo related item in the following data type page and click Next to start scanning.
  4. Then you can easily extract photos from iTunes backup just simply click “Recover”.

extract-deleted-photos-from-iTunes-backup

These two methods mentioned above can also be also applied to all generations of iOS devices like iPhone, iPad and iPod Touch, with the support of the latest iOS version (iOS 12 included).

Related readings:

ipad video player 2018

Best Video Player for iPad 2018

For some HD videos or 4K videos, iPad is a good device to play on with its large screen. However, now with so many video provider apps like Youtube or Vimeo, some people may enjoy a full pure video player only for the local videos playing, avoiding the large and noisy TV shows. As one of those people, I tried some video apps on my iPad, and below is my review for each app, which could be a reference when you trying to get a clean video player on iPad.

Continue reading →

ios 11.4 messages in icloud

iOS 11.4: What is “Messages in iCloud”

Last week Apple officially released iOS 11.4, Which hasn’t been too long since the release of iOS 11.3. We once had a peek of this iCloud messages feature in the beta of iOS 11.3, but Apple removed it from the public version eventually. And now in iOS 11.4, Messages in iCloud finally go public for every iOS users.

Differences of “Messages in iCloud”

Before iOS 11.4,

  •  Message is a default item of iCloud backup. Every time you sync your iOS device with iCloud, messages will be included, but you can’t turn it off.
  • All your edits to messages including deletion won’t be synced among all your Apple device, which means if you deleted a message or a thread on your iPhone, your iPad or mac will still have the messages if all your devices run under the same Apple ID. Any action you do to messages on one device won’t affect another.
  • If you want to get old message history on a new device, you must restore from your backup.

ios 11 messages on icloud page

Since iOS 11.4,

  • Messages on iCloud isn’t default anymore. You can toggle it on or off anytime anywhere.
  • If you’ve activated Messages in iCloud, all your action to messages on one of your Apple device will be synced among all your Apple device. For instance, if you deleted an iMessage on your iPad, then this iMessage will also be removed from your other Apple product like iPhone or Mac.
  • Store all your messages and threads on iCloud to save local storage on iPhone, including stickers, photos, images, SMS, attachments, etc.
  • Theoretically you can save more storage for iCloud since messages are not included in iCloud backup if you’ve enabled this feature. And from then on your iCloud backup will be smaller.
  • You can easily sync old messages to your new device.

How to Enable Messages in iCloud

Preparation (3 conditions):

  1. Update your iOS device to iOS 11.4 at least, as well as your Mac to the latest macOS.
  2. Set up iCloud and run all your Apple devices under the same Apple ID.
  3. Turn on two-factor authentication for your Apple ID. (Phone number is needed)

On iPhone/iPad:

Open IPhone/iPad Settings > Apple ID > iCloud > Messages, and turn it on.

activate messages in icloud on iphone

On Mac:

Open Messages > Preferences > Accounts, and tick on “Enable Messages in iCloud”.

turn on icloud messages on mac

If you choose to disable this feature, messages will still be backed up in iCloud backup as before.

More:
If you accidentally lost iMessages on iPhone, you may need this guide on How to Recover Deleted iMessages.

how to share files from iphone to android

How to Share Files from iPhone to Android with Friends

Smartphone now becomes a necessity for people in daily life day by day, so it’s very common to see some people holding their Android phone while others iPhone. But it is well-known that iOS isn’t as open as Android system, which mean it’s sort of difficult if you want to share files between iPhone and Android. If you have a friend using Android while you using iPhone, what to do if you want to share a file with each other?

Method 1: Use Email

One of the most common way is by using email. No matter what phone you use, it won’t go against this basic communication tool in the Age of Internet. Using email is simple both on iPhone and Android phone, especially when you installed a mail app.

Generally if you want to send file to email on Android: Choose the file and click share button, and then choose “Send to/by Email”.

On iPhone: It depends on how much your mail app support iOS. For example If you use Outlook or Gmail, you can just choose a file inside an app, click Share to “Copy to Outlook/Gmail” and send it as an email. But if you are keen on the original iOS Mail app, then you need to copy the file to the iOS Files app first (this featured in iOS 11; if you haven’t updated, you need a file manager app), then long press the file in the Files app and send it by email with “Share > Mail”.

Afterwards, you or your friend can receive and download the sharing file from the mailbox.

Method 2: Use Cloud Services

There are a lot of cloud services in today for people, and most of them have adopted appropriate mobile apps on both iOS and Android platforms.

Among those, many of them like Google Drive, OneDrive and Dropbox allow people to share files with others. All you need is have an account in one of these cloud services and installed their apps on your phone.

To share files with your friends by these cloud apps, you just need to upload the files to the cloud app, and follow the sharing path of the cloud service you choose.

Normally you just have to share the link of the uploaded file to you friend, then he or she can view and download the sharing file (Mostly you don’t need a cloud account to access file from a share link).

Method 3: Use Third-party Apps

Also, you could try some transfer apps working on multi-platform, but most of them need you to install on both devices to work, such as Shareit, Filemaster, and Send Anywhere.

Tips:

If you want to transfer files among iOS devices, the most easiest way is using AirDrop. You just need to open AirDrop on both devices (need WiFi and Bluetooth on, though need not network), and then you can quickly pair with each other and send files.

For Android users, Bluetooth is a good tool to share files among Android devices. Though iPhone has Bluetooth as well, there is one thing to be cleared that iPhone can’t be paired with Android via Bluetooth

If you have other useful ways, welcome to inform me. Thanks!

recover iphone photos on mac

How to Retrieve Deleted iPhone Photos on Mac

I accidentally deleted some photos from my iPhone. I have a mac, is there any way to retrieve the deleted photos on mac?

Continue reading →

transfer files from iphone to computer

How to Transfer Files from iPhone/iPad to Windows PC

Nowadays cell phones almost as smart as computers, it’s common that we read and store some files on iPhone. In the precious post, we discussed how to download web files on iPhone; today, I will tell you how to transfer files from iPhone to computer, including those downloaded from web or inside other apps. Continue reading →

recover iphone trimmed videos

How to Recover Trimmed Video from iPhone

For people who enjoy self-recording, they often spending time to edit and trim the video after taking it with iPhone or iPad for the best. Yet there’s a problem that perhaps many people have encountered: I trimmed the video wrong, is there any way to un-trim/get back the original video? Continue reading →

How to Download Files from Web on iPhone

“Where is the Download folder on iPhone/iPad?”

I guess this is one of the questions that many people would ask when they first use iPhone, especially they just transferred from Android recently. Yet unfortunately, iOS doesn’t set a download folder for its devices. When you surf Internet with browser with iPhone, you can’t click a download link on Safari and expect it to directly download files like being on the Android. To download files on iPhone, you need some different ways. Continue reading →